Smart Tracking of SoC Verification Progress Using Synopsys' Hierarchical Verification Plan (HVP)
Kishan Kalavadiya, Janak Patel (eInfochips)
Keywords
Hierarchical Verification Plan (HVP), Unified Report Generator (URG), Coverage plan, Test plan, Assertion plan, Regression, System-on-Chip (SoC)
Introduction
SoC (System-on-Chip) Verification effort mainly includes three key phases: Planning, Development and Verification. Planning phase includes preparing verification strategy in terms of Test plan, Coverage plan and Assertion plan. Verification of complex SoC requires all micro level data (i.e. Individual Test status in Regression, Functional and Code Coverage numbers, etc.) to be collected at a common place for better tracking. Manual efforts to collect the above mentioned information may lead to human errors in reports, making the tracking data inaccurate and additional engineering efforts. Automating the whole verification tracking process is the ideal solution, which guarantees the accuracy and avoids tedious management from engineers.
Synopsys’ VCS addresses aforesaid problem using Hierarchical Verification Plan (HVP), which provides flexibility to the user through user defined attributes while preparing the verification plan as per the project requirement. Once the verification environment is ready and the process of regression testing begins, using Hierarchical Verification Plan, one can gather all required information as mentioned earlier, at a common place in a spreadsheet or document format. Also one can back-annotate the results in individual plans, as well as in sub-sheets of those plans (if maintained in excel format). This article is targeted for Synopsys’ VCS users, contains the flow of the Hierarchical Verification Plan creation in excel format, along with the detailed steps for integration of the same in verification environment with suitable example.
Basic flow for HVP Generation

Figure 1. Basic Flow Diagram
In planning phase of the project, the initial step is to generate verification plan which contains test plan, coverage plan and assertion plan. Hierarchical Verification Plan (HVP) supports multiple formats like XML, Doc and others. In this article, the flow of HVP is explained using XML format. When the Regression phase begins, after every regression, the next step is to generate the merged coverage database using Unified Report Generator (URG). It is permissible to provide any user defined information which cannot be available in coverage database (like Regression results, Assertion summary and others) as external user data from command line. Using URG and spreadsheet annotator, user can get all the verification results back-annotated in respective plans. Detailed steps to generate HVP followed by the example are covered in the upcoming section.
Detailed Steps for HVP generation
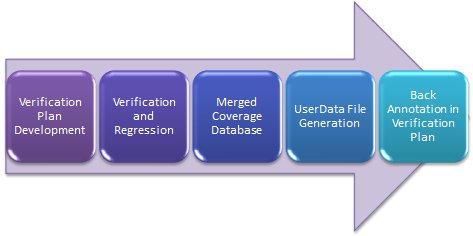
Figure 2. Steps for HVP Generation
A detailed explanation for each step mentioned in Figure 2 for HVP generation is explained below,
Step 1: Verification Plan Development
Generate plan file which contains the mapping of functional as well as code coverage, test scenarios and assertions in terms of features and measures. User can easily generate this plan file from DVE.
Sample plan file in .hvp format for code coverage is as shown in Figure 3.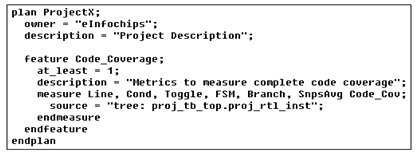
Figure 3. Sample Plan File for HVP
Next step is to convert the above plan file into XML format using the below command:
hvp genxls -lca -plan ei_SoC_planfile.hvp
This command will generate the output file: ei_SoC_planfile.hvp.xml
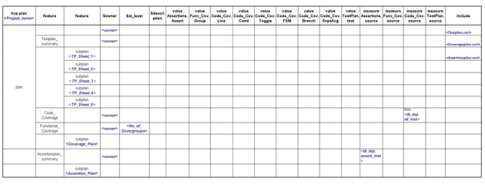
It is not necessary to generate plan file in .hvp format in DVE every time. User can maintain one generalized format of XML or Doc verification plan, helping the user to update project specific information easily. If the test plan contains separate sheets for each block, those sheets needs to be added as Sub plan in the top level verification plan. Also the user needs to include all respective plans (i.e. Testplan.xml, Coverageplan.xml, Assertionplan.xml) in the top level verification plan as shown below in Figure 4.
Figure 4. Generalize Format of Top Level Verification Plan
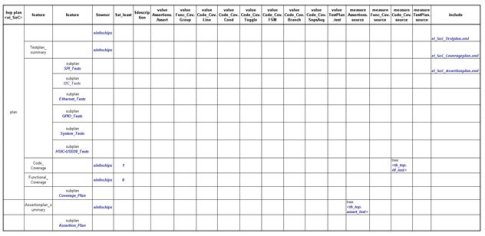
A sample top level XML plan file for automotive ei_SoC verification is shown in Figure 5. This Automotive SoC contains the blocks like SPI, I2C, Ethernet, GPIO, HSIC-USB2.0, etc. ei_SoC_Testplan.xml, ei_SoC_Coverageplan.xml and ei_SoC_Assertionplan.xml are included in the last column as shown in Figure 5. Testplan ei_SoC_Testplan.xml contains the separate sheet for each block of the SoC. Sample testplan for SPI block and System level scenarios are shown in Figure 6.
Figure 5. Sample Top Level Verification Plan
After creating top level verification plan, user needs to add some relevant options, which are required for the back-annotation of information, as in the respective plan(s) shown in Figure 6, 7 and 8. The same options are also required in the Top level verification plan for back-annotation of results.
Figure 6. Test Plan(SPI, System)
Figure 7. Coverage Plan
Figure 8. Assertion Plan
Step 2: Verification and Regression
After completing the verification plan development, next step would be to develop the test cases for functional verification of SoC and parallelly start running the regression of all test cases.
Step 3: Merge Coverage Database
After running the regression, merge the coverage database of all the test cases which is required for the back-annotation of coverage numbers in coverage plan using below command:
urg -dir ei_SoC_merged_cov.vdb <list of vdb files for individual test>
Step 4: UserData File Generation
If user wants to annotate some user defined information in any of the plans, it can be given as input using command line option -userdata. Here we have given ei_SoC_regression_status.txt to annotate the pass/fail status of individual test cases and ei_SoC_assertion_status.txt to annotate the assertion results in assertion plan. This user defined information is generated by using the regression result post-processing script. Sample user data file for regression status is as shown in Figure 9.
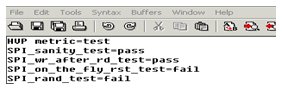
Figure 9. Sample Userdata File for Regression Status
Step 5: Back-Annotation in Verification Plan
To get back-annotated HVP report in .xml.ann format, user needs to apply the following command with inputs shown below:
hvp annotate -lca -plan ei_SoC_planfile.hvp.xml -dir ei_SoC_merged_cov.vdb -userdata ei_SoC_regression_status.txt ei_SoC_assertion_status.txt -plan_out ei_SoC_planfile.ann.xml
User can also get the annotated XML with user defined name using –plan_out option.
For HTML report of HVP, user needs to apply the following command with inputs shown below:
urg -plan ei_SoC_planfile.hvp.xml.hvp -dir ei_SoC_merged_cov.vdb -userdata ei_SoC_regression_status.txt ei_SoC_assertion_status.txt -report <path to o/p directory>
Result Analysis
After following the above mentioned steps, results get annotated in XML sheet. Annotated XML contains a separate sheet for top level results followed by individual sheet for each sub plan (i.e. SPI_Tests, I2C_Tests, Ethernet_Tests, GPIO_Tests, System_Tests, HSIC-USB20_Tests, Coverage_Plan, Assertion_Plan) as shown in Figure 9. User can jump to the individual sub sheet by clicking on the name of that sub plan in the features column of top level sheet as shown in Figure 10. Annotated test plan for SPI Block and System level scenarios with pass/fail status of individual test are shown Figure 11. Similarly, Figure 11 and 12 shows the annotated Coverage numbers and Assertion status with different colors as per the different range of numbers.
Figure 10. Top Level Annotated Report
Figure 11. Annotated Test Plan (SPI, System)
Figure 12. Annotated Coverage Plan
Figure 13. Annotated Assertion Plan
Conclusion
The development of Hierarchical Verification Plan (HVP) using Synopsys’ Unified Report Generator (URG) can facilitate an easier and more efficient way to track the verification progress. Hierarchical Verification Plan (HVP) provides deeper visibility into the regression process and coverage analysis. Key features of HVP like HTML report generation, multiple supported formats (i.e. XML, Doc etc.), back-annotation of reports in plan itself can help us in reducing the time and manual efforts required while preparing the closure documents of the project. We have used HVP flow in automotive application chip verification project, which have PCIe, Ethernet, HSIC – USB 2.0, QSPI, SPI, I2C and GPIO functional blocks. It helped us to automate the process for tracking and reporting verification items planed with actual result observed very effectively.
Visit www.einfochips.com for more information.
Related Semiconductor IP
- Ultra-Low-Power LPDDR3/LPDDR2/DDR3L Combo Subsystem
- 1G BASE-T Ethernet Verification IP
- Network-on-Chip (NoC)
- Microsecond Channel (MSC/MSC-Plus) Controller
- 12-bit, 400 MSPS SAR ADC - TSMC 12nm FFC
Related Articles
- Smart way to memory controller verification: Synopsys Memory VIP
- Rapid Validation of Post-Silicon Devices Using Verification IP
- Low Power Analysis and Verification of Super Speed Inter-Chip (SSIC) IP
- Fast, Thorough Verification of Multiprocessor SoC Cache Coherency
Latest Articles
- Extending and Accelerating Inner Product Masking with Fault Detection via Instruction Set Extension
- ioPUF+: A PUF Based on I/O Pull-Up/Down Resistors for Secret Key Generation in IoT Nodes
- In-Situ Encryption of Single-Transistor Nonvolatile Memories without Density Loss
- David vs. Goliath: Can Small Models Win Big with Agentic AI in Hardware Design?
- RoMe: Row Granularity Access Memory System for Large Language Models
