Formal Property Checking for IP - A Case Study
By Sakthivel Veerappalam, HCL Technologies
ABSTRACT
Broadly, formal verification is applied in the following areas,
- Equivalence Checking (RTL vs RTL, RTL vs netlist, netlist vs netlist etc.)
- Theorem Proving (Prove a user defined theorem)
- Model Checking (Property Analysis)
In this paper we concentrate only on formal analysis using ‘model checking’. The model checking uses assertions (term broadly used to mean assertion, assume, restrict) written in System Verilog Assertions (SVA) language to prove the given design behavior. The focus of the paper is to provide an introductory flow of formal property check, however, the paper uses a real example to explain the flow.
The design (DUT) chosen was JTAG controller which is a brand new IP being developed within HCL. The approach used to verify was traditional (SV/UVM) + Formal approach. The examples used in this paper as based on the JTAG IP.
The tool used for formal property check was Cadence Jasper property check and hence all examples used in the paper are based on Jasper.
This paper also describes assertion coding guidelines and styles that help reduce assertion coding effort (See the Appendix Section for more details).
The rest of the paper provides details on this work.
1. Organization of paper
This paper talks about the steps and procedures involved to perform formal analysis on a given design.
MAS (Micro Architecture Specification) was the primary input used for formal planning. Apart from this IEEE 1149.1 standard was used as reference.
This paper talks about the strategies followed to perform FA and captures the sample properties and assumptions defined to prove the control path of JTAG IP and also it captures list of bugs found through this analysis. This paper also covers how the FA properties are reused with simulation environment.
2. Introduction
Formal verification is still not mainstream and not the primary method of verification due to certain limitations. At the time of writing this paper, formal has been generally deployed as complementary to traditional simulation method. We took the same approach for JTAG controller where SV/UVM based verification was the primary method and formal complemented it. The description for not using formal method as the primary method is beyond the scope of this paper.
2.1 Formal Analysis Terminology
| DUT | Design Under Test |
| SVA | System Verilog Assertion |
| MAS | Micro Architecture Specification |
| FSM | Finite State Machine |
| JTAG | Joint Test Access Group |
| JG | Cadence Jasper Gold Tool |
| FA | Formal Analysis |
| CEX | Counter Examples |
| IR | Instruction Register |
| IP | Intellectual Property |
| PSL | Property Specification Language |
| MAS | This term is used in generic sense to mean any design input such as Architecture, Micro-architecture etc. |
| Assertions | In this paper, this may broadly refer to SVA assertions, assume, restrict |
2.2 JTAG IP Overview
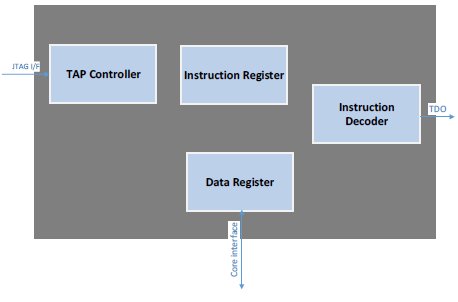
Figure 1: IP Block Diagram
The JTAG controller IP implements the TAP FSM as defined in IEEE 1149.1-2001 spec along with along with all the supporting logic necessary in a typical chip.
The IP implements few Mandatory instructions and many optional instructions (boundary scan and user data instructions). All optional instructions are controlled by SV parameters. This IP also has logic for securing 3 different address ranges.
The IP has control and data blocks. To apply the formal techniques, the following 3 blocks are selected mainly because these are control function dominated. These 3 blocks are proven both at block level and top level (IP Top).
- TAP FSM (as defined in IEEE 1149.1-2001)
- TAP Controller
- IR (Instruction Register) Decoder
As the optional instructions are controlled using SV parameters, JG tool should be run with multiple session. Each session can enable one more optional instructions.
2.3. Jasper Gold (JG) Overview
The Jasper tool takes the DUT and Assertion file as inputs. It analyzes (all syntactical checks) and elaborates (Synthesis for formal analysis) before starting formal proof. All the JG commands can be embedded into ‘tcl” session files. The JG also takes the clock name (primary and secondary clocks) from user (through tcl file OR GUI). The JG can have only one reset signal which also can be taken from user along with “active” state (active high or low) etc. Once the clocks and resets are defined, JG will start the formal analysis using “prove” and report the pass or fail status. If any assertions fail, the JG tool will create counter examples (CEX) which shows how and when the particular property is failed. When property fails, the CEX can be visualized using “visualize” wave application and debugged.
Jasper formal tool also has many other applications built over formal platform (like advanced Linting, Combo Loop Analysis, Coverage analysis, CDC, Security features etc.).

Session File (tcl) :
PASS Status :

FAIL Status:

3. Advantages of Formal Verification
Performing formal property checking has the following advantages over the simulation approach
- Verification is mostly fully automatic except for initial set-up, property coding
- Verification can be started as soon as RTL is ready. It need not wait for the readiness of complete RTL. It can start the analysis even with basic functionalities
- Reset Analysis
- Sanity checks etc.
In a way, formal inherently lends itself to agile process
- Testbench effort is not as exhaustive as in simulation method. So, a lot of effort is saved
- As testbench is not required, stimulus generation will be automatically managed by the FA tool with or without constraints around it
- The prove will be extremely fast compared to dynamic simulations
- Simulations usually takes more time to detect the corner cases, FSM deadlock conditions. Sometimes it need additional metrics (coverage data) to identify the corners. But FA tool can easily find and reach those cases in quick time (fraction of minutes)
- Both black box and white box approach can be used
- Probably, the most important aspect of formal is that verification is 100%. There is no concept of corner cases or missed scenarios etc. In other words, if the property and constraints are correct than if the property passes then the design has no bugs associated with the property in question. Contrast this with simulation method, the verification is always “best effort” based and despite any amount of verification, there is no guarantee that the design is bug free
4. Limitations of Formal Verification
Even though formal verification has many advantages it does have certain disadvantages:
- As the design size grows, the state-space increases exponentially. So, when compared to a design with 2048 flops, a design with 2049 flops will have an exponential increase in the state space. Hence as the design size increases, quickly we reach an upper limit where the machine cannot handle the size of the design or the time taken to explore the state space starts to reach a point of diminishing returns. This is called the problem of state-space explosion.
- FA is not suitable for data paths functions except for simple functions. This is true especially for algorithmic blocks
- FA is good for verifying a system but not for validating the system.
- FA can only handle RTL logic. Any analog blocks will get black boxed or can be removed from the DUT during FA
5. Top Level Architecture and High Level Flow
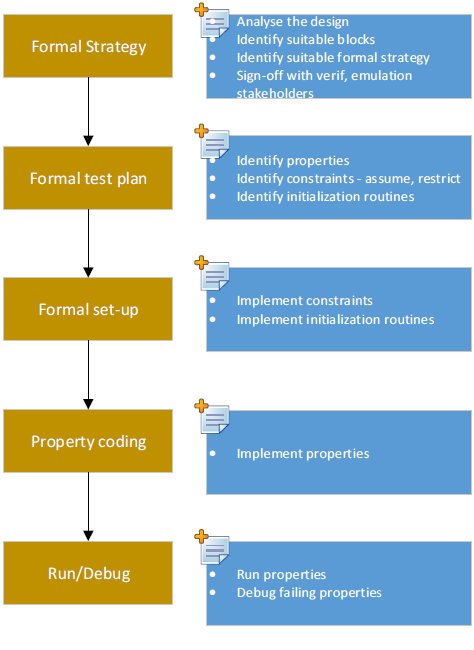
5.1. Formal Test Plan
The first step is to extract all the properties from the design MAS and document them. The formal test plan will have the details of assertions and assumptions identified and to be coded. The following is the sample plan defined for JTAG IP FA.
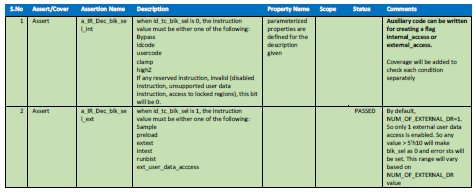
5.2. Property Development
The Chip/IP/Block architecture, MAS is the main source for developing right properties. As the FA works based on the properties (in the form of assert/assume), the Architecture and/or MAS must have the detailed design behavior (like inputs and corresponding outputs along with control logic details). If the DUT is a standard protocol like PCIe, AHB/AXI, it is easy to develop interface properties but complete design behavior must be documented in the architecture document or MAS to extract implementation specific properties
For example, in the JTAG IP, the FSM block is based on the standard protocol. To develop properties for this FSM, we don’t need to wait for the MAS or any other document. But to prove the functionality of other blocks we need the reference MAS.
Here is the sample description defined in the JTAG IP MAS for one of the control signal. These kind descriptions will be easy for creating a property.
![]()
5.2.1. Auxiliary Code
It is not mandatory that all rules (properties) MUST be coded (simple/complex) using SVA constructs only.
In General, Formal Verification tools will look for properties to be defined using simple logic so that formal tools can easily understand the rule and prove it efficiently. This process will also improve the tool’s performance. If the rule is complex, instead of writing one complex property, it can be broken into.
- Multiple small and simple properties (Divide and Conquer Technique) and/or
- Write auxiliary code
Auxiliary code is nothing but a synthesizable simple glue/wrapper logic written in SV in order to break the complex logic into simple logic and subsequently use them in properties/assertions. This code should be written by the property developer and this logic can be part of the property file also.
Another way to look at the auxiliary code is, it makes property implementation simple by providing useful signals that can be consumed by properties. For example, if a DUT has an encoded bit vector then it may make sense to decode this and generate decoded signals that can be used in property. This avoids the process of decoding in the properties and may make property look clean. Of course, this is highly subjective and the call about what auxiliary code to add is something the verification engineer has to take.
Here is some sample auxiliary code used in our JTAG IP FA.
“Assume that, reserved instructions, invalid instructions, disabled instructions, secured region access are treated as “invalid” instructions. if we write property for all different type of invalid instructions the property will looks like too clumsy and it can be simplified using the following auxiliary code.”

auxiliary code - only for illustration only
Now use them in assertions/assume/cover to control the formal analysis. Now the assertion looks very simple and at the same time meets our requirement.

Auxillary code used in the property
5.2.2. Parameterized Properties
Property development time is critical for starting formal analysis. if we write property for each rule, it will take more time to develop them and too many lines will be required to code them and managing the property file will be complicated. This problem can be avoided by writing parameterized properties.
When we define programmable properties, it can be reused across multiple similar assertion/assumption. It reduces overall property development time and complete the formal analysis much faster.
The properties can be developed incrementally. Once the basic properties are proven, it will boost the confidence level as well as it will be aligned with the incremental RTL development.
See the Appendix Section for coding guidelines followed for various property development.
5.2.3. Constraints:
To understand why constraints are critical, it is important to note that primary goal of a formal tool is to disprove the property under scope. In a way, it is taking the role of a verification engineer in traditional flow where the main objective of the engineer is to find bugs in the design.
As stated earlier, the FA tool doesn’t have any testbench. The FA tool automatically generates stimulus to the DUT and analyzes the DUT behavior in the context of the property under scope. By default, FA tool won’t apply any constraints to DUT inputs. Basically it appropriately controls every signal unless it is constrained. In this context, the formal tool will pick value for unconstrained signals, nets such that the property fails. If the values so chosen for nets/signals are such that they are illegal, then the property has failed but not due to any bug in the DUT but due to the fact that the signal/nets it depends has taken an incorrect value(s). It is for this reason; constraints have to be defined so that formal tool uses property values. Another way to look at constraints is that it excludes invalid state space for formal analysis. This can be achieved by “assume” or “restrict”. These constructs apply constraints to the FA environment in which DUT should behave correctly. As simulator will ignore “restrict”, to define the reusable assumptions, it is recommended to use “assume” than using “restrict”. when targeted from top level, these constraints may or may not apply.
In the case of JTAG IR decoder, the instruction will be driven by interfacing RTL block. So the assumption is not needed as interfacing block will generate appropriate legal combinations.
The following statements instructs the FA tool not to generate any reserved and unsupported user data instructions.
![]()
5.2.4. Binding Assertions:
When the assertions are defined, the assertion enclosing module can be directly connected with the DUT using SV ‘bind’ construct. When bind is executed, the assertion instance will be added to the design hierarchy automatically. The primary advantage of using bind is that it avoids touching RTL. Another advantage is due to modularity of the code Assertions from formal can be re-used in simulation and vice versa.
General Format:
bind <DUT> <Assert mod name> [#(parameter overriding)] <assert_inst_name> (port mapping);
For example,
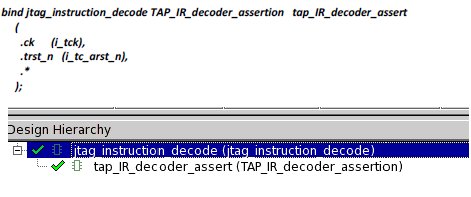
6. Sample Statistics
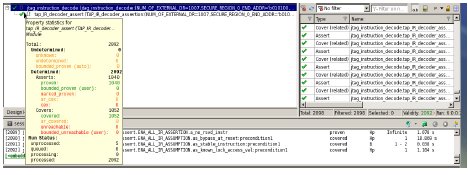
When prove is in progress and/or prove is completed, the status of each property can be observed. Here is the sample statistics captured when prove is completed. It also shows which ‘engine’ is used and the life cycle of the properties. In this example the prove is completed within 19 Seconds.
IR Decoder Statistics (at block level):
7. Project Data
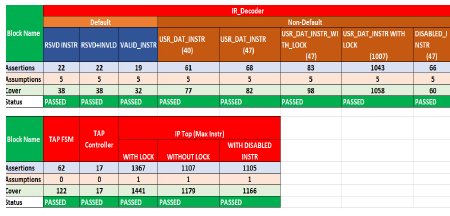
Once the FA is done at the block level, the same assertions and bindfile (s) can be reused at the top level. All block level assumptions can be masked using parameter (ASSUME_EN=0). All the 3 blocks (tap_fsm_assert, tap_ctrl_assert and tap_IR_decoder_assert) will be visible in the below snapshot

It is recommended to keep all block level assertions as it is while proving from top level.
As all block level assertions are proven, they can be changed to ‘assume’ while doing FA from top level. But it is not mandatory. This can be achieved by programming parameter “ASSERT_EN=0”. When ‘assume’ is not used with ‘cover property’, JG is not reporting failures when one of the property is intentionally violated. For ex, when TAP FSM is in CAPTURE_IR_STATE and tms=0, the FSM should transition to “IDLE” State. When this property is intentionally violated (i.e. Stay at UPDAT_IR State), JG was reporting PASS when cover property was not used. If ‘cover property’ is added, the coverage won’t be hit and FA reports failures.
See the following snapshot for reference.

At the same time, if ‘assert’ is used instead of ‘assume’ failure was reported correctly. See the snapshot.

Here are the total number of assertions/cover are proven at both block level and top level.
- Number of engineers: 1
- Total duration: 3 weeks
- Typical run time: ~5 min/block
- Total blocks under scope: 3 blocks
9. Notable Bugs
As stated earlier, the FA tool will execute and prove the properties within fraction of minutes. To be more specific, the Jasper Gold took less than 2 minutes to prove 1200 assertions+coverage.
9.1. Arithmetic Calculation Issue
”Output signal o_id_tc_blk_sel shall be 0 for data register block instructions and selected optional boundary scan operations – CLAMP and HIGHZ, 1 for boundary scan operations – SAMPLE/PRELOAD, EXTEST, INTEST, RUNBIST or external data register instructions. For any invalid instruction or access to any locked regions, this register shall be driven default value of “0” to select bypass operation. These values shall be defined by local parameter in the implementation”
For the above description, one of the property is, when valid external user data instruction (‘h10) is selected, the tc_blk_sel must be 1 (outputs are registered with clock. So 1 cycle delay is implicit). The following buggy RTL has created two problems.
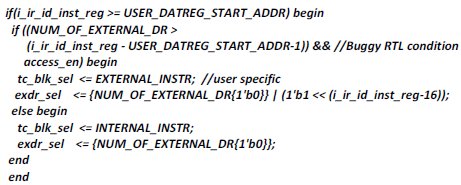
RTL Setup:
USER_DATAREG_START_ADDR = ‘h10; NUM_OF_EXTERNAL_DR=1; EXTERNAL_INSTR=1; INTERNAL_INSTR=0
Problem 1:
When the user data instruction (i_ir_id_inst_reg) becomes ‘h11 (unsupported instruction), the expected behavior is “tc_blk_sel” must be 0 (i.e. external access is disabled). But the arithmetic calculation in the 2nd ‘if’ condition becomes 0 and asserts “tc_blk_sel” as 1. Here is the JG FA output.

CEX (Counter Example):
Green circle is the evaluation starting point. Orange circle is the endpoint where ‘tc_blk_sel” is 1 and property fails.

RTL Analysis by JG:
Here is the isolated code identified by the JG tool.

Problem 2:
When the user data instruction (i_ir_id_inst_reg) becomes ‘h10 (supported instruction), the expected behavior is both “exdr_sel[0] and tc_blk_sel” must be 1 (i.e. external user data is enabled). But the RTL was making exdr_sel[0] and tc_blk_sel as 0 and disabling the external user data access. Here is the JG FA output.
CEX (Counter Example):

9.2. Secured Region Issue:
“””” i_lock_access [0] – 1 Access restricted for address within this range including the boundary address
i_lock_access [0] – 0 : Access is allowed to this region “”””
When the JTAG instruction falls under the programmed secured region and the lock_access[*] is set, external user data access must be blocked. Here is the buggy RTL code. This code always allows the instruction under these address ranges.

RTL Setup:
SECURE_REGION_0_START_ADDR = ‘h10; SECURE_REGION_0_END_ADDR = ‘h14; i_lock_access[0]=1
CEX (Counter Example):
Red circle shows the failure point. For the instruction ‘h10, exdr_sel[0] must NOT be set because this address falls under the secured region.
10. Reusing Formal Assertion at Simulation
Whatever assertions developed for FA, the same can be reused and integrated well with simulation environment without any changes. The following two strategies were used to make it portable in both the environments.
- Developed assertions with the constructs supported by both simulation tool and Formal Analysis tool (For ex, avoided ‘restrict’ construct)
- All assertions are coded with simple sequence expressions along with auxiliary code support.
- Used SV ‘bind’ to integrate the assertions with DUT.
11. Appendix – Good practices
In the concurrent assertion property, the properties body will be having two major portions.
Antecedent:
This is the precondition for the property. when this condition becomes true, the property evaluation will be started.
Consequent:
One or more sequence and/or sequence expression will be evaluated once the antecedent is satisfied.
Missed Hidden Property:
In general, while writing properties, need to think about the hidden properties also. For example,
Property Statement:
“”” when the TAP FSM is in UPDATE_IR state, the output signal “ir_update” must be 0. In all other states it shall be 1”””.
For the above statement, if the property is coded like this (see below). it is possible to miss the hidden property.
property p_check_ir_update1;
@(posedge clk) disable iff (!trst_n) (c_state == TAP_IR_UPDATE_ST) |-> ir_update==0 ;
endproperty : p_check_ir_update1
The hidden property is, “””in other TAP states, the “ir_update” must not assume 0”””. The property developer may intend to write another property to cover this hidden property.
property p_check_ir_update2;
@(posedge clk) disable iff (!trst_n) (c_state != TAP_IR_UPDATE_ST) |-> ir_update ;
endproperty : p_check_ir_update2
Instead of writing two properties, the property statement can be coded like this,
property p_check_ir_update; //merge the above two in a simple and single property
@(posedge clk) disable iff (!trst_n) ir_update ==0 |-> (c_state == TAP_IR_UPDATE_ST) ;
endproperty : p_check_ir_update
The above single property matches both the given property statement and the hidden property.
1) Use Macro:
Use SV macro manipulation to simplify assertion calls. If the purpose is to define both ‘assert’ and ‘cover’ for the particular property, instead of duplicating the property (one for assert and other one for cover), simple macro management can be used to achieve the goal.
Here are some reusable properties developed for JTAG IP FA and how the macros are used to define assert and cover in a simple way.
The property “p_check_sig_val_with_1state” is defined using parameters. When the “sig” equals to “val”, the property evaluation will be started. The evaluation will be success when previous value of “state” matches the “c_state1” value and at the same time “cond” must be true.
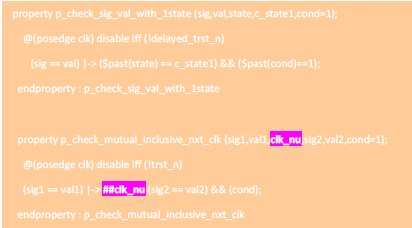
The above parameterized property can be used in both ‘assert’/’assume’ and ‘cover” using the following macro manipulation. The argument “name” can define the assert and cover property instance name.

Now implement the assert and cover by passing the various arguments to the macro. In the below example,
- 1st macro call is checking the value of tc_ir_update to become 0 when the state is in UPDATE_IR (no other additional condition applied).
- In the 2nd call, the same macro is called again to check different signal (tc_dr_shift) with additional condition (! id_tc_blk_en)

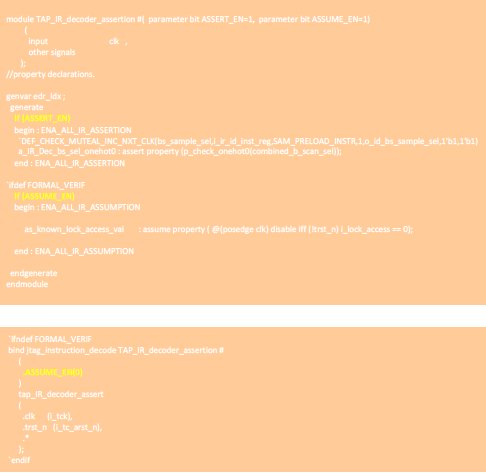
2) Enable/Disable Assertion/Assumption:
It is a good coding practice to define the assertions and assumptions with enable/disable control. This will help in reusing the assertions/assumption in both FA and Simulation at block/top level.
The assumptions are used to constraint the FA to generate legal scenarios. As assertions are already in place to check the properties, these assumptions can be masked while moving to top level.
In JTAG IP FA Environment, the property modules are defined with the parameters. By default, these assertions and assumptions are enabled. when binding is done (explained in later sections), the parameters can be controlled.
3) Use SV generate:
when bit vectors or arrays need to be checked, it is better to group them inside SV “generate” statement instead of writing assertion for each bit.
In some cases, DUT may split the vectors into individual bits. In such case, the auxiliary code can be written to group them into vectors and use them inside the ‘generate’ statement.
In JTAG IP FA, the external user data instructions are bit-vectored and maximum 1007 user data instructions are supported. The assertions are verified for all the bits using a ‘for loop” inside the generate construct. Here is the sample code.
//NUM_OF_EXTERNAL_DR = 1007
genvar edr_idx;
generate: EDR_CHECK
begin
for(edr_idx=0; edr_idx<NUM_OF_EXTERNAL_DR;edr_idx++) //16 normal instr + bypass
begin
assert property (@(posedge clk) disable iff (!trst_n) (i_ir_id_inst_reg== ('h10+edr_idx)) && !(|lock_acc) |-> ##1 o_id_exdr_sel[edr_idx]==1'b1);
end
endgenerate
4) Onehot Encoding:
When only one control bit should be set in a bit vector, it is property developer’s responsibility to verify them wisely. One suggestion here is to use $onehot0.
In JTAG IP FA, the external instruction can be either boundary scan or user data instructions. At a time either all bits will be ‘0’ OR only one bit will be set. if boundary scan is selected, only one control signal should be set and all external user data register enable control signal must be 0 and vice versa.
The JTAG IP defines separate control signals (no bit vector) for each boundary scan instruction and bit vector for user defined data instructions.
When DUT doesn’t provide bit vector, it is property developer’s responsibility to form bit vector using simple auxiliary code as defined below.
- Group all single boundary scan control signals into a vector using auxiliary code.
assign combined_b_scan_sel = {o_id_bs_extest_sel,o_id_bs_sample_sel,o_id_bs_intest_sel,o_id_bs_runbist_sel,o_id_bs_clamp_sel, o_id_bs_highz_sel};
- Define onehot0 for the following
- boundary scan bit vectors alone
 only one bit is set in boundary scan operation
 - user data instructions alone
 only one bit is set in user data operation
 - combining boundary scan + user data instr
 make sure that when BS is selected, all user data controls are 0 and vice versa.
a_IR_Dec_extdrANDbs_onehot0 : assert property (p_check_onehot0(combined_b_scan_extdr_sel));
a_IR_Dec_extdr_onehot0 : assert property (p_check_onehot0(o_id_exdr_sel));
a_IR_Dec_bs_sel_onehot0 : assert property (p_check_onehot0(combined_b_scan_sel));
Related Semiconductor IP
- Ultra-Low-Power LPDDR3/LPDDR2/DDR3L Combo Subsystem
- Parameterizable compact BCH codec
- 1G BASE-T Ethernet Verification IP
- Network-on-Chip (NoC)
- Microsecond Channel (MSC/MSC-Plus) Controller
Related Articles
- Case Study: Can you afford to ignore formal analysis?
- Context Based Clock Gating Technique For Low Power Designs of IoT Applications - A DesignWare IP Case Study
- UPF Constraint coding for SoC - A Case Study
- CAST Provides a Functional Safety RISC-V Processor IP for Microchip FPGAs
Latest Articles
- Lyra: A Hardware-Accelerated RISC-V Verification Framework with Generative Model-Based Processor Fuzzing
- Leveraging FPGAs for Homomorphic Matrix-Vector Multiplication in Oblivious Message Retrieval
- Extending and Accelerating Inner Product Masking with Fault Detection via Instruction Set Extension
- ioPUF+: A PUF Based on I/O Pull-Up/Down Resistors for Secret Key Generation in IoT Nodes
- In-Situ Encryption of Single-Transistor Nonvolatile Memories without Density Loss